How to Create a Glow Effect Text Effect in Illustrator
In this tutorial, you will learn how to create a glow effect text effect in Adobe Illustrator, using the Appearance panel and glow effects.
What you will learn in this vector text effect tutorial:
How to start a new document in Illustrator
How to apply multiple fills in the Appearance panel
How to create a neon glow effect in Illustrator
Tutorial Assets
To complete the tutorial you will need the following font:
Gendarwo - Scary Typeface Font
1. How to Open a New Document
1.
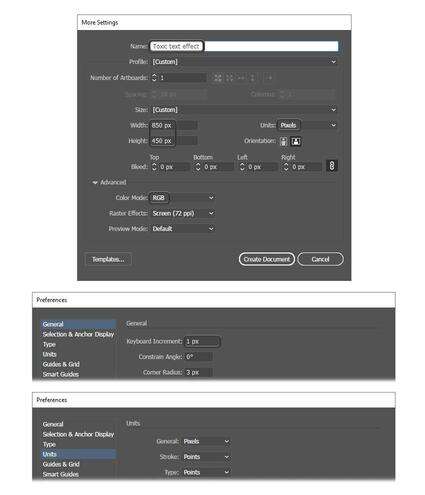
Launch Adobe Illustrator and go to File > New to open a blank document. Type a name for your file, set up the dimensions and then select Pixels as Units and RGB as Color Mode.
Next, go to Edit > Preferences > General, set the Keyboard Increment to 1 px and, while there, go to Units to make sure they are set as in the following image. I usually work with these settings, and they will help you throughout the drawing process.
2. How to Create the Background
2.
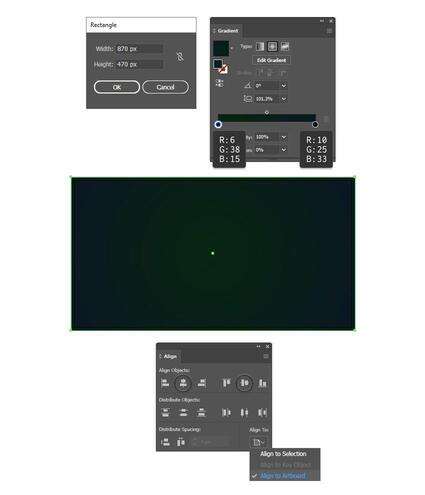
Take the Rectangle Tool (M) and simply click on your artboard to open the Rectangle window. Set the Width to 870 px and the Height to 470 px, and then click OK to create the background rectangle. Color it with the radial gradient shown.
With the rectangle still selected, go to the Align panel (Window > Align) and first, make sure to select the Align to Artboard option under the Align to button. Now, click on Horizontal Align Center and Vertical Align Center in order to perfectly center it and cover the entire artboard because it is slightly bigger.
3. How to Create the Text
3.
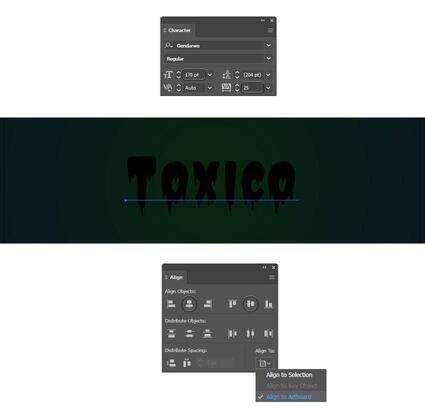
Take the Type Tool (T), click on your artboard, and write "Toxico" using the Gendarwo Font, size of 170 pt. Under Set the tracking for the selected characters, choose 25 in order to spread the letters a little.
Keep the text selected and press Horizontal Align Center and Vertical Align Center in the Align panel to position it exactly in the center of the artboard.
4. How to Create the Appearance of the Text
4.
Step 1
With the text still selected, remove the existing fill color in the toolbar. It will make the text invisible, but this is exactly what we want.
To obtain the glow effect, Illustrator has the option to add multiple appearances on the same piece of text, along with effects, blending modes, gradients, and transparencies. By the end, you will also be able to save all these appearances in the Graphic Styles panel and easily use this style again.

Step 2
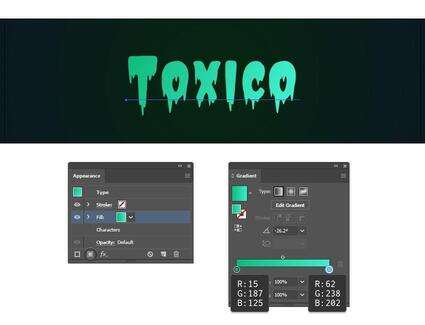
Make sure that the invisible text is still selected and press Add New Fill at the bottom of the Appearance panel. Use the linear gradient shown to color it.
This is the first Fill attribute in the Appearance panel, and we will continue to build the glow effect.
Step 3
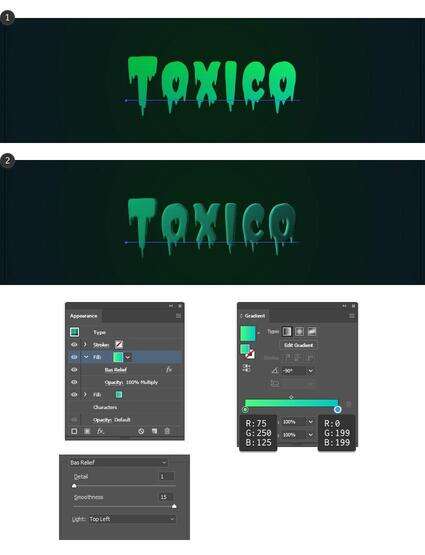
While the text is still selected, press Add New Fill again to add a second Fill attribute above the first. Use the linear gradient shown to color it (1).
Next, go to Effect > Sketch > Bas Relief and apply the settings indicated. Set the Detail to 1 (minimum), the Smoothness to 15 (maximum) and the Light to Top Left. This will add some dimension to the text and create shading towards the end of it (2).
Step 4
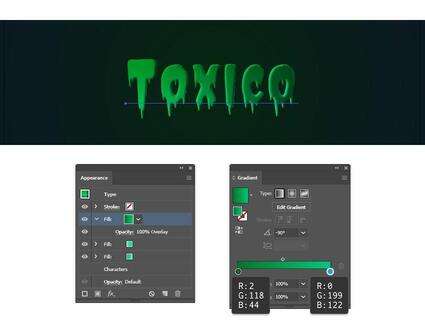
While the text is still selected, press Add New Fill again to add a third Fill attribute at the top of the Appearance panel. Use a green to light green linear gradient and set the Angle to -90 degrees. Change the Blending Mode to Overlay; this will make the text look more green. The toxic look is starting to come together.
Step 5
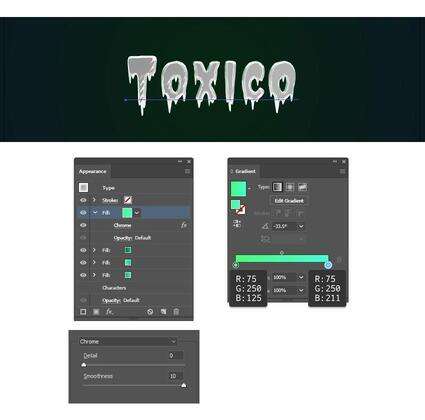
Keep the text selected, and let's add another fill above the rest by pressing the Add New Fill button again. Use the linear gradient shown to color it.
Make sure that this Fill attribute is selected, and then go to Effect > Sketch > Chrome. Set the Detail to 0 (minimum) and the Smoothness to 10 (maximum), and hit OK. As a result, we will get a bit of texture on the text.
Step 6
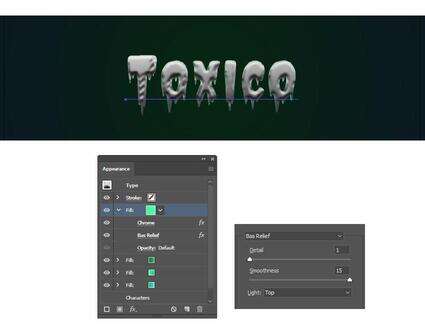
While the text and the last Fill attribute are still selected, go to Effect > Sketch > Bas Relief to apply this effect. Set the Detail to 1 (minimum) and the Smoothness to 15 (maximum), as before, but set the Light to Top this time.
Together with the Chrome effect, this will create surface variations and give a more fluid look to the toxic effect. We will also get a highlight at the top of the letters and shading at the bottom.
Step 7
Make sure that the text is selected, and change the Blending Mode of the last Fill attribute to Soft Light. The two effects applied will blend with the fill color underneath and create a more realistic Illustrator effect.
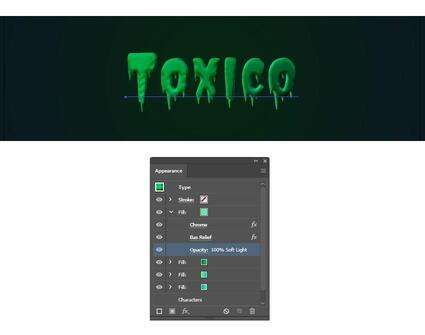
Step 8
While the text stays selected, press Add New Fill again to add a fifth fill in the Appearance panel. Use a gray to darker gray linear gradient and set the Angle to -90 degrees. Move this Fill between the third and the fourth Fill attributes created earlier, so it is under the Chrome and Bas Relief effects applied. Set the Blending Mode to Color Dodge, and this will give us that neon glow effect as something very toxic should be.
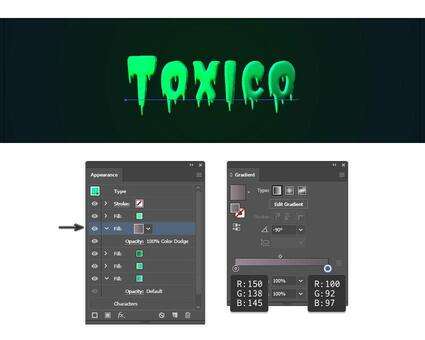
Step 9
It's time to add the shadow. Keep the text selected, and press Add New Fill again to add another Fill attribute at the bottom of the Appearance panel. Use the linear gradient shown; then go to Effect > Stylize > Drop Shadow and apply the settings in the image below.
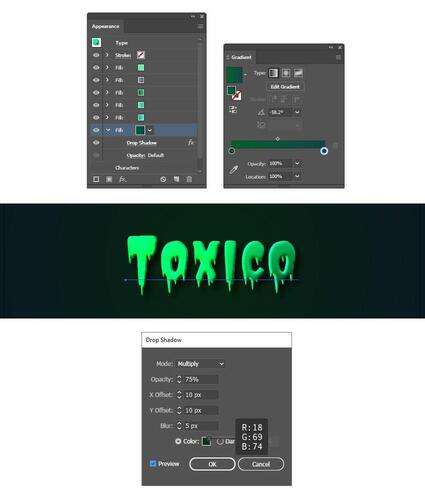
Step 10
We can't have a toxic effect without a glow effect around it, right?
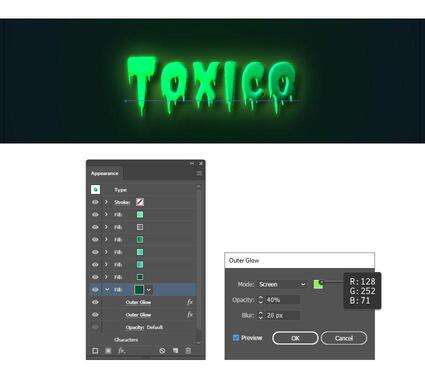
Add another Fill attribute at the bottom of the Appearance panel and use the same gradient from the previous step. Next, go to Effect > Stylize > Outer Glow and apply the settings shown using a bright green color. This will create a discreet glow effect around the text as the Blur is only 4 px, but we are not done yet.
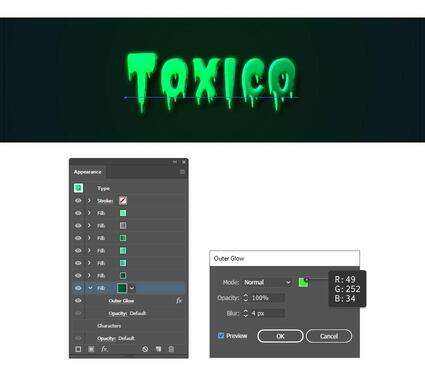
Step 11
While the text and the last Fill attribute stay selected, go back to Effect > Stylize > Outer Glow and apply this effect one more time. The settings and the color are different this time, and the Blur is much bigger.
When you use this glow effect, Illustrator will automatically create that neon glow around the text, and this will enhance the style and make all the difference, especially when applied twice.
5. How to Create the Toxic Particles Around the Text
5.
Step 1
At this point, the Illustrator glow effect is complete, but we can add a few extra details.
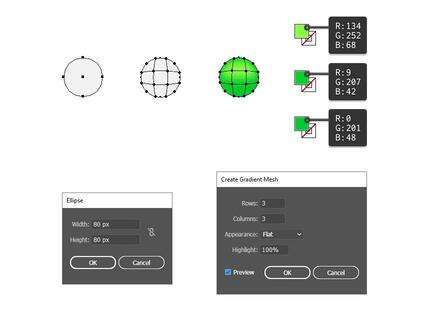
Take the Ellipse Tool (L), click on your artboard and draw an 80 x 80 px circle. The fill color is not important at the moment.
While the circle stays selected, go to Object > Create Gradient Mesh. Enter 3 Rows and 3 Columns, and then hit OK. Now, you can select the individual mesh points and color them as shown in the image below, using the three shades of green indicated.
Step 2
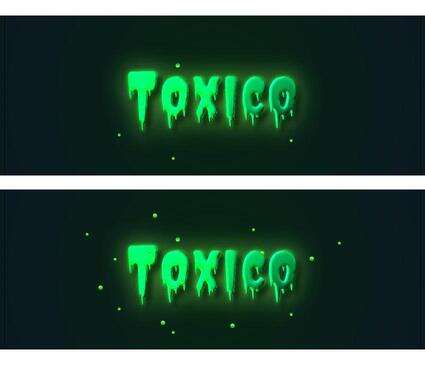
Make copies of different sizes of the circle obtained in the previous step and arrange them randomly on the text and around the text as toxic glowing particles. Add as many as you want until you are happy with the result.
Step 3
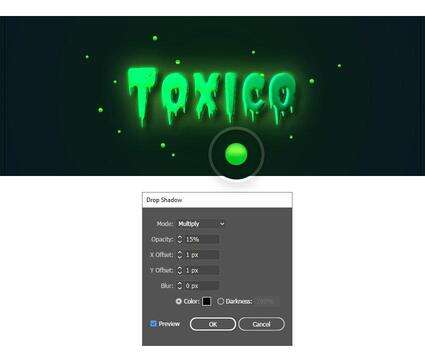
Group (Control-G) all the glowing particles; then go to Effect > Stylize > Drop Shadow and apply the settings shown. This will add a small shadow under each circle, just like for the glow text effect.
Step 4
Keep the group of particles selected and go to Effect > Stylize > Outer Glow. Apply the settings shown, and we will obtain a glow effect around each circle, just like the text. This way, things are consistent throughout the entire text design.
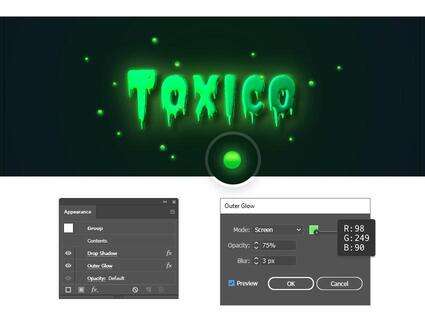
Congratulation! You're Done
Here is the final image of the glow effect. Now you know how to create fully editable text effects in Adobe Illustrator, and you can apply these techniques in your future projects.
If you need more inspiration and resources to improve your drawing skills, make sure to head over to GraphicRiver where you will find more Illustrator styles, a multitude of fonts to use, and vectors ready to personalize your final text effect.

Expand Your Text Effect Designing Skills!
Keep drawing and learning with these recommended tutorials, which will explain plenty of other useful techniques.
How to Create a Cool Bubble Font Text EffectIn the following steps, you will learn how to create a bubble text design using a bubble letter font in Adobe Illustrator.
Andrei Marius
25 Aug 2020
Text Effects
How to Create a Multi-Layered Text Effect in Adobe IllustratorIn the following steps, you will learn how to create a fully editable, multi-layered text effect in Adobe Illustrator.
Andrei Marius
19 Sep 2018
Text Effects
How to Create a Bones Text Effect in Adobe IllustratorIn the following steps you will learn how to create a simple bones text effect in Adobe Illustrator.
Andrei Marius
17 Nov 2017
Brushes
How to Create a Retro Chrome Text Effect in Adobe IllustratorIn the following steps you will learn how to create a retro chrome text effect in Adobe Illustrator.
Andrei Marius
15 Jun 2020
Text Effects
How to Create a Wrapped Ribbon Text Effect in Adobe IllustratorIn the following steps you will learn how to create a wrapped ribbon text effect in Adobe Illustrator.
Andrei Marius
29 Nov 2019
Text Effects
How to Create a Coconut Text Effect in Adobe IllustratorLearn to create a fun coconut text effect that will make you dream of a tropical vacation.
Diana Toma
20 Mar 2019
Text Effects
How to Create a Half-Blurred Text Effect in Adobe IllustratorIn the following steps, you will learn how to create a half-blurred text effect in Adobe Illustrator.
Andrei Marius
06 Aug 2018
Text Effects
How to Create a Western Text Effect in Adobe IllustratorIn the following tutorial, you will learn how to create a simple Western font text effect in Adobe Illustrator.
Andrei Marius
03 Mar 2021
Text Effects