How to Design a Face Mask
The COVID-19 pandemic has made face masks become a necessity as well as a part of our 'new normal' day-to-day lives. Some of us can have fun while making a small contribution to that situation by easily creating our own custom face masks!
In this tutorial, I will show you how to create a half-face mask design, using Adobe Illustrator, and upload it to the Placeit mockup generator to create a face-mask mockup.
What You Will Learn in This Face Mask Tutorial
How to plan and set up a half face mask design file
How to vectorize a cat snout illustration using Adobe Illustrator
How to create a mockup using Placeit
What Will I Need to Make a Designer Face Mask?
For this fun face mask design tutorial, I have decided to create a half-face kitten snout artwork, because who doesn't love kittens!
You’ll need access to the following programs:
Adobe Illustrator
Placeit.net (mockup generator for the final presentation)
If you would like to save time, you can learn how to make a face mask with design elements and resources easily accessible from Envato Elements.
1. How to Set Up a Half Face Mask File Design File
1.
Step 1
Launch Adobe Illustrator.
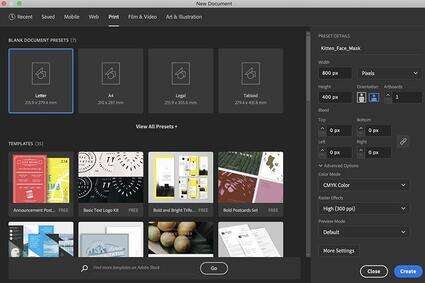
First, set up a New Document (File > New or Command-N) with these settings:
Name: Kitten_Face_Mask
Number of Artboards: 1
Width: 800
Height: 400
Units: Pixels
From the Advanced Tab:
Color Mode: CMYK
Raster Effects: Screen
Preview Mode: Default
Step 2
Typically, I would sketch out a design and upload it to Illustrator before vectoring. However, illustrating a cat snout is quite basic and easy to draw, so we can easily improvise and create a fashionable kitten face mask without needing to sketching one first.
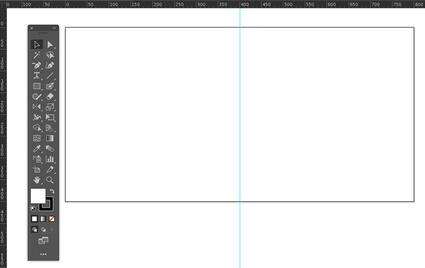
First, let's set up our Ruler Guides to the center of the artboard. The center is where we will place our kitten nose.
To view the Rulers, choose View > Rulers > Show Rulers or Command-R.
To create a Ruler Guide, move your pointer onto the vertical ruler guide and drag the guide onto the 400 px mark, the center of our 800 px length.
By default, the guides are unlocked, so we need to Lock the guides by selecting View > Guides > Lock Guides.
Step 3
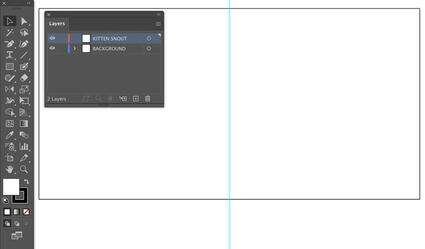
Now let's turn on the Smart Guides (Command-U) to help us align our artwork, and then open the Layers panel (Window > Layers).
On the Layers panel, name 'Layer 1' as 'BACKGROUND' and click the Create New Layer icon. Name the new layer 'KITTEN SNOUT'.
2. How to Draw the Base of the Kitten Snout
2.
Step 1
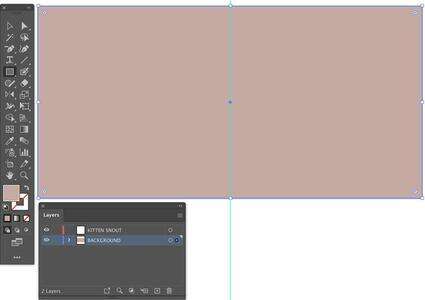
Begin by working on the 'BACKGROUND' layer, where we will create the background cat snout color and face pattern.
From the Tools menu, select the Rectangle Tool (M) and apply a sandy brown Fill of #c1a8a1, with null Stroke color. With the help of the Smart Guides, draw an 800 x 400 px rectangle on the artboard.
Step 2
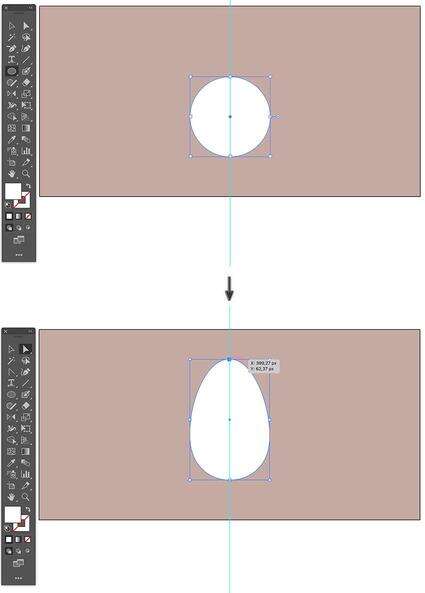
Next, we will draw a basic egg-shaped snout. Select the Ellipse Tool (L) and apply a white Fill with null Stroke color.
Draw an ellipse in the center of the artboard, approximately 168 x 168 px. The Smart Guides will help you center it on the artboard.
Then grab the Direct Selection Tool (A), select the top anchor point of the ellipse, and drag it up as shown to create an egg-shaped snout.
Step 3
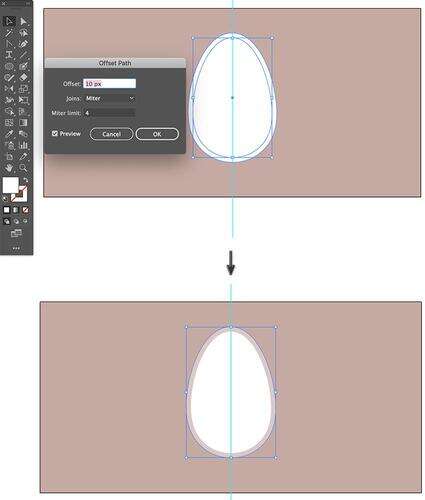
With the egg selected, we need to offset the shape to create the cat head pattern behind the snout.
Object > Path > Offset Path
Offset: 10 px
Joins: Miter
Miter Limit: 4
OK
Give the offset shape a color Fill of #d8c7c4.
Step 4
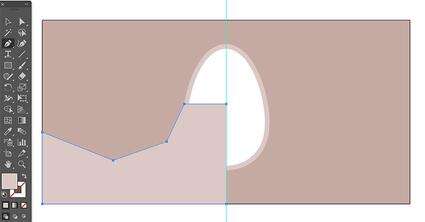
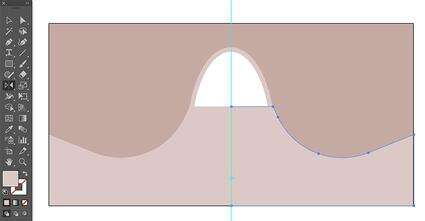
Now, select the Pen Tool (P) from the Tools menu, and draw a shape similar to the one shown in the image below.
The Smart Guides will help you align with the edges.
Step 5
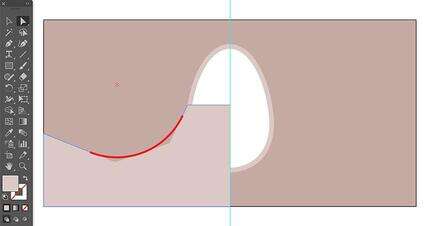
Use the Direct Selection Tool (A), hold down the Shift key to select the two center anchor points. This will enable the Live Corners widget, which is the white circle icon displayed next to a selected corner. Drag the Live Corners widget with the Direct Selection Tool (A) to convert the corners into round corners. The corner will be highlighted in red when you reach the proximity of the Live Corners widget.
Step 6
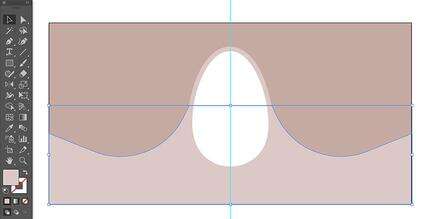
Now let's reflect the rounded shape to the other side of the artboard.
Simply select the rounded shape, and pick the Reflect Tool (O). Set the center reference point to the center of the artboard, where the guide is; Option-Shift-Drag and release when the shape is mirrored across.
Step 7
Now, use the Selection Tool (V), hold Shift to select both rounded shapes, and then we need to place the shapes back behind the white snout shape: Object > Arrange > Send Backward (Command-[).
When you are done, go to the Layers panel, Lock the BACKGROUND layer, and move onto the 'KITTEN SNOUT' layer.
Step 8
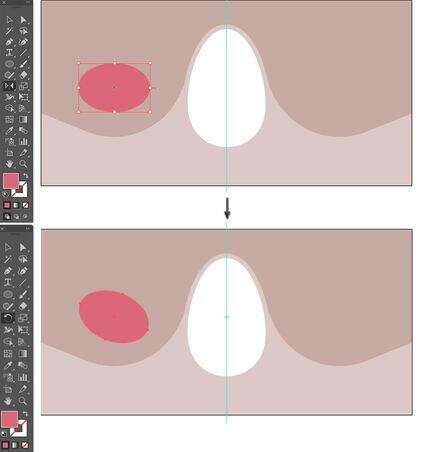
Moving on, let's add some blush to our kitten's cheeks.
Grab the Ellipse Tool (L) and draw an ellipse of about 160 x 120px. Then choose the Rotate Tool (R), and rotate the ellipse by -21°.
Step 9
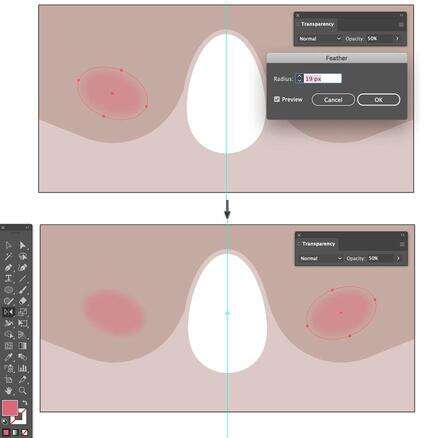
Open the Transparency panel: Window > Transparency. Set the Transparency to 50%.
Then let's feather the edges so that it looks like a blush. Effect > Stylize > Feather and set the Radius to 19 px, and then pick the Reflect Tool (O). Set the center reference point to the center of the artboard, where the guide is; Option-Shift-Drag and release when the shape is replicated across.
When you are done, Lock the 'BACKGROUND' Layer in the Layers panel, and move onto the 'KITTEN SNOUT' layer.
3. How to Illustrate a Kitten Snout Face Mask Using Adobe Illustrator
3.
Step 1
Now it's time to draw the features of a kitten snout. We will draw one side, and then mirror it to the other side.
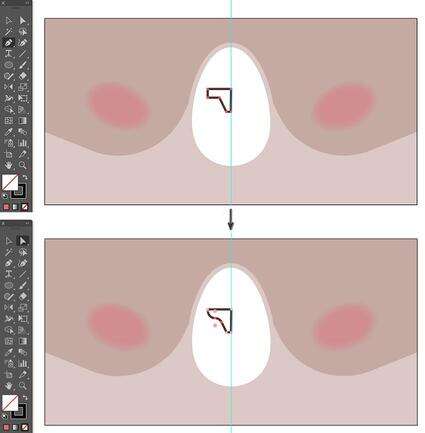
We will start with the basic triangular-shaped nose. Grab the Pen Tool (P), set the stroke to 4 pt from the top menu bar, and apply a black stroke color.
Take the Direct Selection Tool (A), hold down the Shift key, and select the two center anchor points shown below to round the Live Corners widgets.
Step 2
We need to create a nostril. Grab the Ellipse Tool (L) and draw a circle of 41 px around the inside of the nose, as shown below.
Open the Pathfinder: Window > Pathfinder. Select both shapes with the Selection Tool (V), and apply the Divide action from the Pathfinder panel. Then grab the Direct Selection Tool (A) to select and delete the excess circular shape.

Step 3
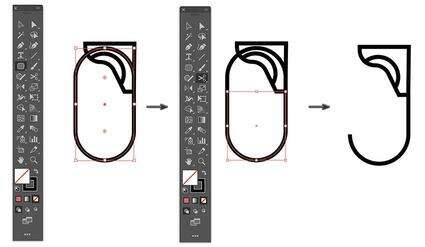
Now let's draw the kitty's lip line. A kitten's mouth is the shape of an anchor. We can easily draw that using the Rounded Rectangle Tool from the Tools menu.
Draw a vertical rounded rectangle of about 60 x 115 px from the mirror edge of the nose to the left, as shown below.
Then grab the Scissors Tool (C) and cut along the rounded rectangle stroke as shown in the image below, and delete the excess stroke.
Step 4
Let's give the nose some color.
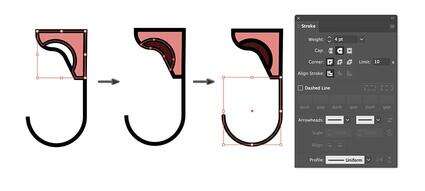
Take the Selection Tool (V), select the nose, and Ungroup (Command-Shift-G) the divided shape, so we can give each shape a different color fill. Give the nose a color Fill of #d7817e. Then select the nostril and give it a color Fill of #441718.
Open Stroke panel (Windows > Stroke). Select the mouth anchor stroke, and apply a Round Cap to make the mouth look smoother.
Step 5
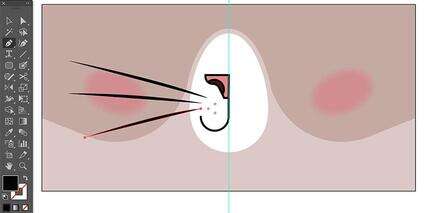
Now let's add some whiskers. When we draw cartoon cats, we usually put three dots on the snout of the cat. These common spots are the "pores" where the whisker follicles are. So to draw these dots, we can simply select the Blob Brush Tool (Shift-B).
Select a color Fill of #c0a7a0 and just click on the artboard area to add your three dots. If you need to modify the width of the brush, use the ] key to increase the brush width or the [ key to decrease.

Step 6
Next, we'll add some whiskers. Take the Pen Tool (P). Apply a black Fill and null stroke color, and freehand draw three curved whiskers, as shown below.
Step 7
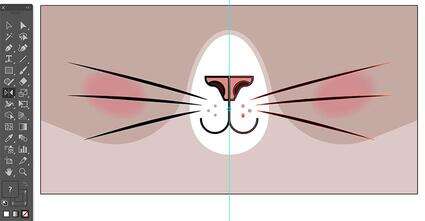
OK, now that half of our kitten face is ready, Command-A to Select All.
Click O for the Reflect Tool and set the center reference point on the center guide; Option-Shift-Drag and release to mirror the shapes across. The kitten face mask design is looking cute so far!
Step 8
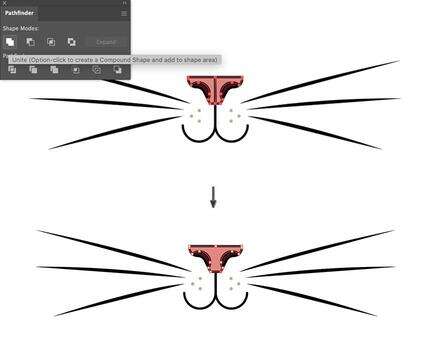
The kitten's nose is currently split by the two shapes, so we need to join it together.
Take the Selection Tool (V) and hold the Shift key to multiple select both nose shapes. Head over to the Pathfinder panel and select Unite from Shape Modes to combine the two shapes.
Now you should have a full nose.
Step 9
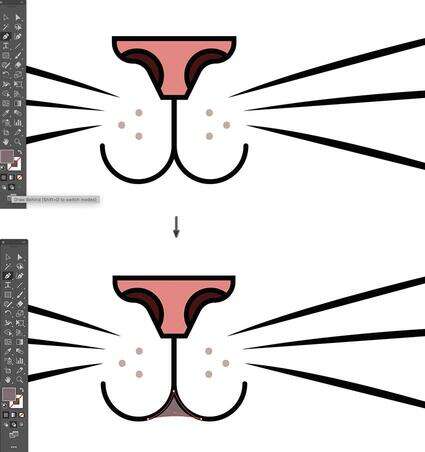
Next, we just need to add a few more features to complement the design, one being the mouth opening.
Grab the Pen Tool (P) and apply a Fill of #7d6c70. In the Tools menu, you will find the Draw Behind mode, which will allow you to draw behind all objects.
Use the Pen Tool (P) to draw a curved triangle along the lip line, as shown. The Smart Guides will help you align the anchors.
Step 10
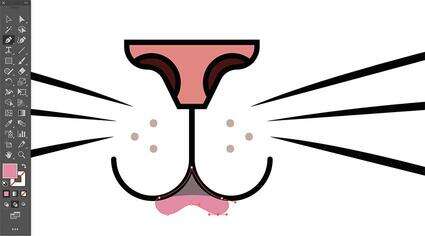
Now let's give the kitten a blushed lip.
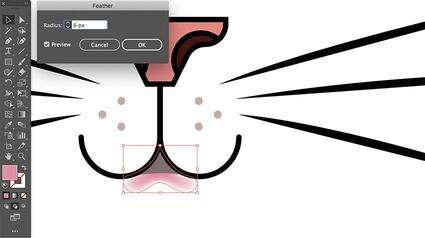
With Draw Behind mode still selected, take the Pen Tool (P) and apply a pinkish Fill of #d785a2. Use the Smart Guides to draw an aligned, wavy lip form, similar to the one below.
Step 11
To create a blushed lip look, we need to Feather the selected lip shape (Effect > Stylize > Feather). Apply a Radius of 6 px, and click OK.
Step 12
And for the last feature, we need to add a chin.
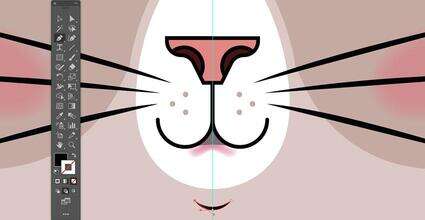
Take the Pen Tool (P). Apply a black Fill and null stroke color, and then draw a smile like the curve below the snout, the same as the one in the image below.
Finally, Save the file (File > Save).
4. How to Create a Placeit Face Mask Mockup
4.
Step 1
Now that our illustration is ready, we need to Export it to create our half face mask design mockup in Placeit.
File > Export > Export As. Select Format: JPEG, and Export.
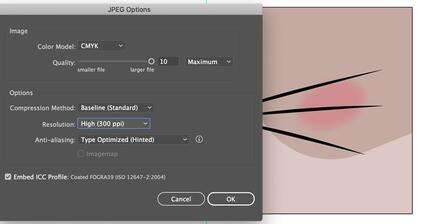
This will open the JPEG Options dialog box. Select:
Color Mode: CMYK
Quality: 10
Resolution: 300 ppi
OK
Step 2
Navigate over to Placeit and sign up for free.
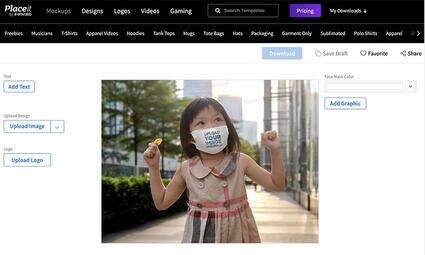
In the header menu, click on Designs. Select Face Mask in the sub-menu, and choose which mockup you would like to try on.
I selected 'Happy Little Girl With Candy'
Step 3
Click Upload Image to upload the exported 'Kitten_Face_Mask.jpg'.
Crop the upload if needed, and then you can customize the 'Happy Little Girl' Image by adding a logo, text, and graphics if you like. Give it a go and try it out!
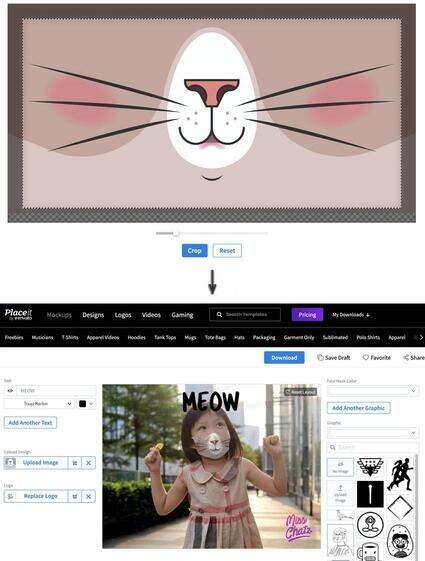
Meow! Your Custom Face Mask Design Is Ready
Now that you know how to make a designer face mask, go ahead and create other bottom half face mask designs and use any of Placeit’s cool face mask mockups to make various designs and share them in the comments below. We’d love to see what you cool face mask designs you come up with.
See some of the different designs of face masks I created here, and if you're interested in other creative designs and fun mockups, check out these cool roundups of tutorials below.

Designing
22 Best Hoodie Mockup Templates (Pullover and Zip-Up)
Nona Blackman
Freebies
How to Get Free T-Shirt Mockups & More on Placeit
Nona Blackman
Product Mockup
24 Best Shopping Bag Mockups (Paper and Kraft Bag Mockups)
Nona Blackman
Book Cover
27 Best Book Mockups Using a Book Mockup Generator
Nona Blackman
Product Mockup
26 Best Coffee Mug Mockups (Using a Mug Mockup Generator)
Nona Blackman