Methods and Precautions for Adding Hard Disks to Desktop Computers
In our daily use of desktop computers, we often encounter the situation of insufficient memory. But it seems very tedious to add hardware. This article will teach you how to add hard disk to the desktop.
Generally speaking, SSD(Solid state disk) are very fast to read, but they are expensive. For the same size of memory, SSD spends four times as much as mechanical drives. If there is no high ask for speed, a mechanical hard drive is better with less budget. This choice will be more sense and cheap, also with enough space.
Properly connect the data line and power line of the hard disk in the case. And fix the hard disk in the storage of the case. Enter the system to initialize the hard disk and new volume operations. Then will be no problem. Here are the details:

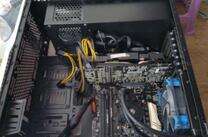
Open your hard drive. Generally, it will attach a SATA data line. Open your chassis cover will see a dense wire, usually just need open one side of the chassis. Just like below, there are a lot of wire. After tidying, pick the power line and SATA line out separately. Then insert into the hard disk slot. Relatively speaking, it is very convenient. After the power is on, and then check the SATA connection. There are at least three interfaces for SATA on the motherboard. Pay attention to the above that marked 2.0 and 3.0. The bigger the number represents the higher the upper limit of the transmission speed. Transmission speed of SSD is very fast. So connected to SATA 3.0, it will help to show the fast read and write performance of SSD.
Now, tool-free cases can directly push the hard disk into the storage and fix it. After then, you can install the cover plate of the case and connect the power. It is not the end after the power is switched on. If we enter the system directly, we can only see our original hard disk. But our hard disk that newly installed has not been detected.

We need to open the system again, right-click [this computer], select [computer management] - [disk management]. It will pop up the initialization hard disk. Select GPT, and then select OK. After finish these operations, the new simple volume assignment disk character can continue. Just the same as formatting.
But there are still two points we need to focus on as follows:
Here, the entire installation for expansion of mechanical hard disk is over. The content is more detailed. And it is as far as possible to do hand in hand, no omission of the teaching. If you learned, there is no need to ask the master to install in the future.