Online Course: Logo Design - 10 Tips & Tricks - Adobe Illustrator CC from Skillshare
Adobe Illustrator Tips for Beginners Based on a Newbie Experience
Learning a new tool or software could be quite an overwhelming experience for a beginner. It is not like old days were there were few known softwares with limited functionalities, and a newbie could easily get a step-by-step tutorial to master them.

With hundreds of apps and a wide range of client requirements, it is sometimes quite perplexing for a beginner to figure out where to start, what to learn and what they are allowed to skip.
In the case of Adobe Illustrator, there are so many things to learn and master, but I have some tips and tricks rolled up my sleeves that could take you through a quick road (a short-cut course) to understanding Adobe Illustrator.
Master the Pen Tool
The Pen Tool could be a little bit daunting if you are a newbie. But as they say, a pen is mightier than the sword, Adobe Illustrator proves it right! It will take you a little while to master it, but once you have, you can do anything in the Illustrator. You can come up with some pretty neat vector graphics without using this tool, but I would recommend pushing yourself and learning it. It would be worth it, I promise!
Go for Clipping Masks
Clipping masks have multiple uses, and in many instances they are a life saver. They save time and limit a group of shapes, paths, patterns, or whatever you need to limit, to a specific area.
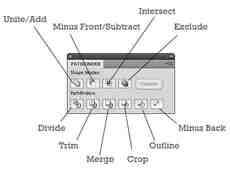
Learn Pathfinder Panel
If you are required to create shapes that are made out of other shapes, this panel has a lot of options that enable you to create the shape you need. It is highly useful in flat designs and basic shapes.
Once you become a pro at it, you could take one step more and try learning the Shape Builder Tool.
Make Customized Brushes
Adobe Illustrator helps you make your own brushes and use them like you want to.
Go for Layers Panel Zen
Being organized is a big plus when it comes to managing work, and Layers Panel Zen lets you have a fuss-free design. You can name your layers and remove the colors and resources that are no longer used in the file. It may not directly benefit the user (unless you are delivering the vector file as an end-result), it is highly recommended to organize your vector files and have a cleaner look at layers.
Explore Swatch Libraries
The Swatch Libraries come with all versions of Adobe Illustrator. It makes you fall in love with colors – you can select skin tone palettes to cool textures. Just go to the Swatches Panel, into the drill-down menu. From there select Open Swatch Library and voila!
Learn Pattern Options:
Pattern options are fun, even if you don’t use them too often, it is good to know about them. There are a lot of cool things you can do with a pattern option. How about creating your own textures? There is a high probability that once you get the hang of it, you won’t feel like leaving it. Learning them will surely bump up your Adobe Illustrator skills.
Save your Vector:
As obvious as this may sound, saving your vector for the web is something that is often lightly taken. It is a simple two-step procedure that many of newbies often mess up with.
The artboard needs to expose all the artwork you want to save. Use the Artboard Tool (Shift – O) to achieve this. Go to File and then Save for Web. Select the type of file (jpg, png, gif, etc) and done!
Don’t lose hope
This may sound like a generic tip (and it really is), but for the newbies who want to learn Adobe Illustrator, this is something that needs to be constantly kept in mind. Getting into vector art is something that’s pretty cool and creative, but it requires determination and patience to learn any new skill.
There will be times when you would question your decision to get into Adobe Illustrator, and then there would be moments when you feel like banging your head on the keyboard. But then, there will also be those moments of glory when you finally achieve learning a panel or saving a basic vector, and it would give you nothing but motivation to move on.
Welcome help
This last tip is something that makes you learn and evolve. It is okay to ask for help when things don’t go your way. Check out online communities, blogs and social media to learn more about Adobe Illustrator. Vector art has grown in the past many years and is still growing.
With these above mentioned 10 tips for beginners using Adobe Illustrator, you can definitely learn a new tool without getting frustrated with the amount of random information you see online. A new skill is always good, and this one will definitely help you in the long run.
Olympia Powell is the freelance writer, artist and web promoter. Started working as a freelance writer cause of huge love for the art of writing and literature. Works as a website promoter and a writer at Having some free time paints paintings, works with ceramics and just tries to make some art. Twitter ID: @olympia_powell
100 Adobe Illustrator Tutorials
PEN TOOL FOCUS: The nice part of the Pen Tool Workflow is it is it have a high level of control, but there are some little hacks if you know how to use the tools together. As you are going through the Workflows, compare and contrast to your own artwork so you can start to select the coloring and value methods that best match your own design style.

TABLET-BASED FOCUS: We are focusing on our Tablet using the Pencil Tool rather than the Pen Tool. The Pencil Tool is my go to tool for the Tablet. It allows for speed, but also offers more control than Pressure Settings. As you Advance through the Modules play around with the Speed and the Efficiency Model.
TABLET-BASED PRESSURE FOCUS: We are focusing on our Tablet Series with our Pressure Tools in Adobe Illustrator. As you Advance through the Modules play around with the Speed and the Efficiency Model. Our Pressure Workflow works best for a hand drawn look or cartoon style to a design. This workflow is a fun one to practice with your Tablet.
DRAWING FOCUS: A lot of our newer Tutorials, Challenges and Workflows have a Drawing for Illustrator Lesson to incorporate the Full-Workflow starting from the Drawing Step. We will be adding on more in this format so you can start from a Photo, Build out your Own Drawing/Trace and Follow Along to the Step by Step Instruction.
TEXT-BASED DESIGN FOCUS: We will be still building out in a Step by Step Format for those of you who are new to Building and using the Type Tools. Most of our attention will be in the Appearance Panel and Layering multiple effects on top of each other to get professional results. Our Text-Based Designs are in an Open Format to Use Your Own Fonts, Colors and Text.
Online Course: Logo Design - 10 Tips & Tricks - Adobe Illustrator CC from Skillshare
Logo Design 10 Tips & Tricks for Adobe Illustrator CC

Have you ever spent a long time using a certain design technique without questioning it – then one day realized you could have achieved the same result in a fraction of the time using a different method?
Or come across a tip that’s opened your eyes to a whole new range of possibilities?
I think we’ve all had those moments… And that’s why as designers we love tips. We collect them over time, and it seems there’s always an easier, better, faster way to do something.
Well I’ve created this class to share my top 10 tips for logo design, using adobe Illustrator CC. I hope you’ll find these as helpful – and essential – as I have!
Here’s a quick overview of the tips I’ve included in this class;
The Shape Builder tool
Rotate to create
Start with fonts
Balancing hacks
Snap to grid
Contrast for the win
Recolor Artwork
Pathfinder
Gradient tips
Outline and customize type
If I add up the combined time all the tips save me on a daily basis, over the course of a year – it’s not hours, it’s weeks of time this helps me save. So if you’re ready to trade an hour or so watching the class for a few extra weeks this year, then hit play on the next lesson!
And actually, before you do… I’ve also created a range of other useful classes on brand identity and logo design, with more coming in future – so don’t forget to follow my profile. Enjoy the class, please post any questions or comments.